LTCGI
LTCGI by _pi_ is a realtime area light solution for VRChat, and is one of the available solutions for realtime area lighting from video sources.
Installation Guide
The following guide walks through adding LTCGI to your scene and setting it up with a default VideoTXL sync video player setup. Refer back to the LTCGI documentation site for more detail on all the various ways to configure LTCGI, but you should avoid their page Realtime Video Setup, as the information contained there is not applicable.
LTCGI will work out of the box without any additional video adapter necessary when using a CRT configured in VideoTXL's Screen Manager.
Configure VideoTXL
This guide assumes you've started by adding a fresh Sync Video Player to the scene, which you can do by utilizing the GameObject menu:
GameObject -> TXL -> VideoTXL -> Sync Video Player
You can also drag the prefab directly from the Packages folder, although adding objects and components from the GameObject menu can have the benefit of ensuring more things are automatically hooked up correctly for you.
Expand the
 Sync Video Player
 Screen Manager
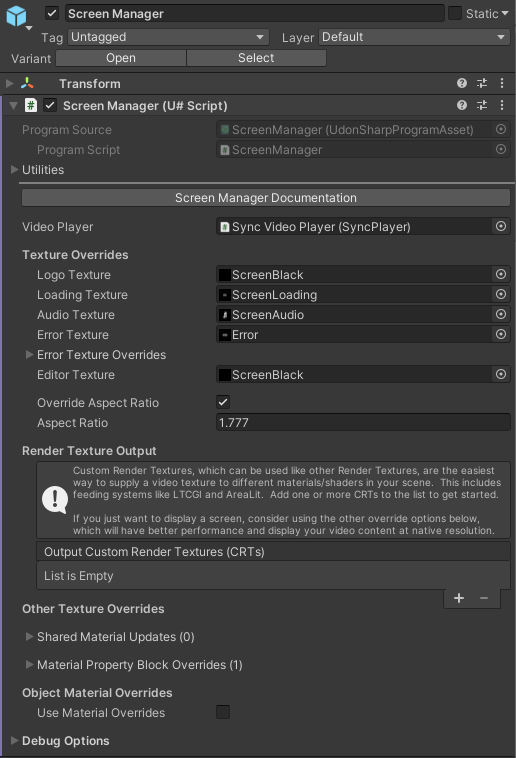
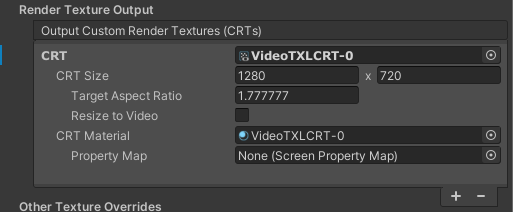
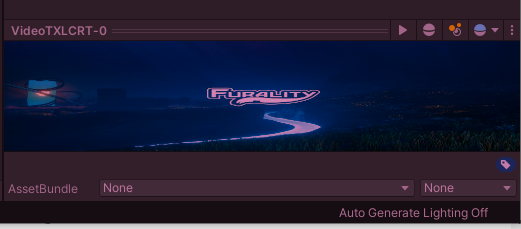
Under Render Texture Output, click the plus (+) on the list to add a new Output CRT. This will create two assets in your project, in a directory next to your scene file with the same name as the scene. The first of those files is VideoTXLCRT-0.asset, though the number may be different if you already have other CRT resources created in your project. Remember this asset, as this is the video texture that you will provide to LTCGI.
CRTs are configured by default to be reasonable for video render, and these settings will also work fine as-is for LTCGI. Changing any of the options should still work with LTCGI.
You can use the same CRT as the video texture for any number of materials in your scene, and the texture has already been corrected for Y-flip, gamma, aspect ratio fit, etc.
Add The LTCGI Controller
Add the LTCGI controller by dragging its prefab into your scene. The prefab is located in:
Packages/LTCGI/LTCGI Controller.prefab
Select the new
 LTCGI Controller
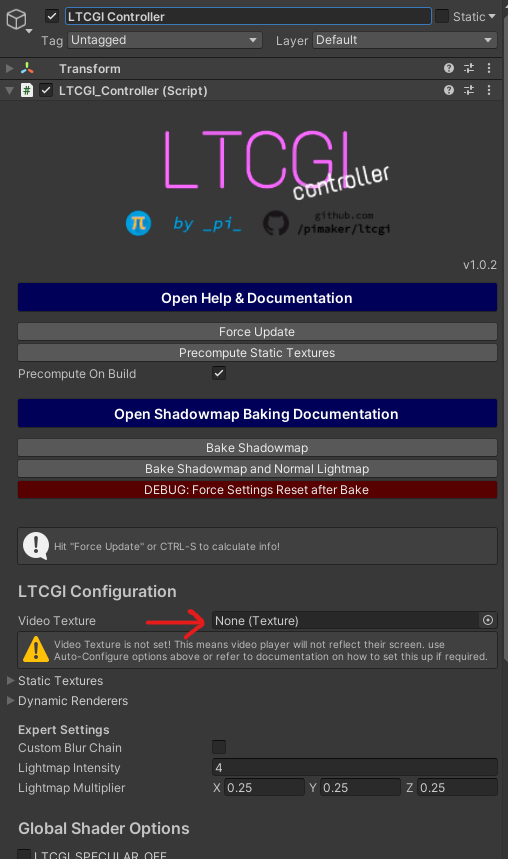
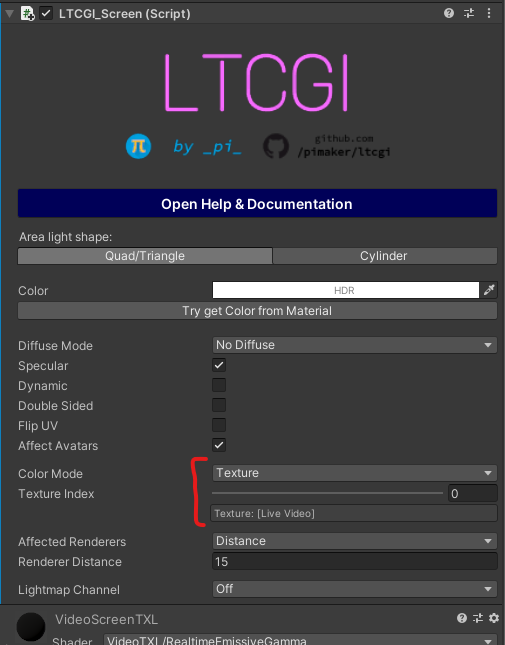
The only setting you need to change here is setting the Video Texture field. Set this to the VideoTXLCRT-0.asset asset that you created in the previous step. At this point, LTCGI may have created an additional script on the object called the LTCGI_Udon Adapter. This is an internal data script that's auto-generated by LTCGI. Do not try to edit this script.
Add the LTCGI Screen Component
LTCGI needs to know about your screen. To do this, you'll need to add an LTCGI_Screen component to your screen. This component is an editor script that's used to capture data about your screen.
The LTCGI_Screen component can only be added to a mesh that's a single quad or tri, such as the built-in Unity quad.
Since the screen that comes with Sync Video Player prefab is a quad, it's possible to add the screen component to it directly. Expand the
Screen Manager QuadIf you're using a screen object that's not a simple quad, such as a flat screen TV mesh with a separate material slot for the video texture, you can create a separate Unity quad and position it in front of the screen. Disable the Mesh Renderer component on the quad to make this LTCGI emitter invisible.
You'll need to make one change to the configuration. Change the Color Mode field to Texture, and then make sure the Texture Index is kept at 0. This maps the video texture to the screen in LTCGI.
Saving your scene should force this data to be updated back on the main LTCGI controller object.
Scene Material Setup
LTCGI requires compatible materials on your walls and other meshes in order for light to be reflected. You can make these materials using LTCGI's own LTCGI_Surface shader. The project maintains a list of compatible shaders here, but there may be others.
Make sure the surfaces you intend to be reflective have been setup with compatible materials.
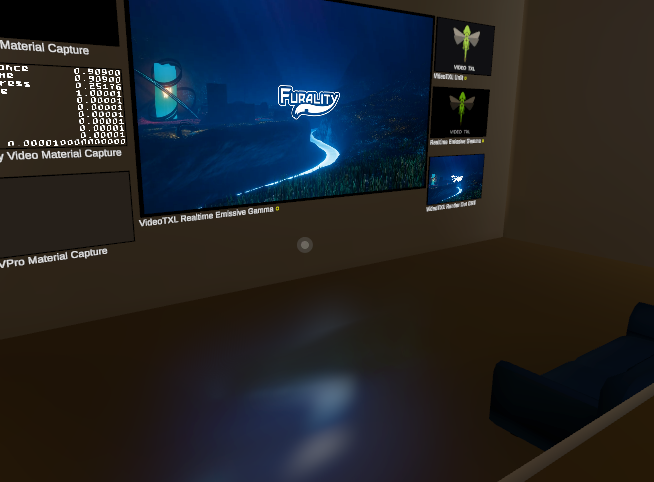
Try It Out
This should be everything you need to get a basic LTCGI scene going with the video player. You can test this with the VRChat Client Sim and loading a video with a Unity-based video source. If the system doesn't appear to be working, but your video is showing up on the screen, try the troubleshooting topics below.
Troubleshooting
Check the CRT
Make sure the CRT is actually updating with video data. If you select the CRT asset in the editor while the simulator is running, you should be able to see its current content in a preview window in the lower right. This content won't necessarily update in realtime, but moving your mouse over it should cause some updates to happen.
Make sure this CRT is showing you video or placeholder data that you expect to see. If you kept using the default screen that came on the Sync Video Player prefab, it gets its video data from a separate material and Material Property Block override, so it wouldn't depend on the CRT functioning correctly.
Check the LTCGI Autogenerated Data
The main LTCGI Controller object has an LTCGI_Udon Adapter script that gets added and updated automatically. This script should be present, and the Screens array should list the LTCGI_Screen component that you added earlier, along with any other screens you've put in your scene. The Renderers array should also list various meshes in your scene that have compatible materials to reflect light. The first element of the LTCGI_LO Ds array should show the CRT you set.
If all of those things aren't true, try pressing the Force Update button on the controller, and check again. If any of those things are still not correct, re-check your setup.